 CHARACTER CREATION
Welcome to STO, Cryptic Studio's Star Trek Online! Since many of the game's
rules and details aren't immediately obvious, I decided to write a beginner's
quick-start guide with information that I've learned while getting started.
When starting in the game, the first thing you will need to do is create your
character. This is the captain of your ship, the character you will control
directly in ground combat.
You can choose one of many races, or invent your own
with the "alien" choice. At first you will be limited to the Federation races,
but after getting half-way through Lieutenant (around level 21 I think?), you'll unlock
the option to create characters in the Klingon faction, and get a third character slot.
Depending on what you choose, you'll have a limited
range of appearance choices, and the race will start with one or two predetermined
traits. You can pick a few others, for a total of four such traits. Which
traits are available depends on the race you've chosen as well. If you go with
the "alien" race, you'll have the largest range of selections available.
All of these traits are only mildly useful, so don't worry too much about what you
choose. Just select something that sounds fun and interesting. You can't change
them down the line, but they aren't highly game impacting. I highly recommend
getting Warp Theorist however, since it gives you a boost to your power
levels on the ship that you would not otherwise have access to. Another excellent
one, if you can get it, is Efficient, since it boosts several power
systems as well. (There's an
excellent guide to character traits you can read too)
You don't need to spend hours perfecting your appearance, since this can be customized
at any time later. The first makeover is free, and subsequent ones start costing
energy credits, but it is not expensive. (A Tailor is in the cargo
area of the Earth spacedock, and there you can customize your captain and boff
appearances, and nearby you can also buy personal equipment for your team.)
However, the first choice you're presented with is which career path you want:
Tactical, Science, or Engineering. You can not change this choice later, so choose
wisely! This is somewhat deceptive, however, in that it only affects various
side skills that you will use in ground combat, and a few space+ground skills you
receive at various level milestones. The most sensible way to make your selection
is based on what ground combat abilities you want. All ground combat is more heavily
gear-based, but the career you choose will determine which ground combat skills you
can cultivate in your captain, and train to your boffs (bridge officers) later, as
well as which "kits" you can use, which grant some combat skills that you might not
otherwise have.
For space skills, you will receive a few career-specific level-milstone skills along
the way. But your space skill trees are the same no matter which career you choose. Your bridge
officers will determine most of your space combat abilities, and your captain skills will
enhance them and the ship's overall effectiveness with the gear you acquire. So your
space capabilities will be determined mostly by the ship and bridge officers
you choose, and only mildly by your captain's career.
NOTE: The above about career choices is assuming you're going to
primarily play PvE (player vs environment) and do so casually. If you are
concerned about optimizing your capabilities at the "end game" and particularly if
you intend to spend a lot of time in PvP (player vs player), then you may wish
to match your captain's career and ship classes and optimize toward that class's
strengths. See this
forum post about this. This is just one point of view, as there are ways to
mitigate these issues and you may choose a more rounded loadout.
SECOND NOTE: One of the first things you should do in your first mission is to right-click
on your weapons' icons in both ground and space, turning their borders green. This
will enable the auto-repeat firing of those weapons, so you only have to mash the
fire button once for each target!
THIRD NOTE: List of skill boxes can be seen HERE. *** (OUT OF DATE!)
GENERAL INFO
There are some things to keep in mind as you play, that aren't always
immediately obvious when you start out the game.
- Consoles are items that enhance your ship's bridge and have nothing
to do with what crew members are stationed there. They provide passive
enhancements primarily.
- Devices are consumable items that are similar to potions in fantasy games. The
ship slots are like a quick-bar for these. These are typically batteries that
give a short-duration boost to a ship's system, such as the shields or weapons.
- Items and equipment have ranks, denoted as a "mark" number. These are restricted
by your captain's rank:
Ensign / Lieutenant = MK I and MK II
Lieutenant Commander = MK III and MK IV
Commander = MK V and MK VI
Captain = MK VII and MK VIII
Admiral = MK IX and MK X
- Energy weapons (phasers, disruptors) start dropping your weapon energy
level if you fire 2 or more of them together. You can actually end up doing
less damage if you overwork your ship. This can be mitigated
to some degree with skills, devices, and power distribution.
- Projectile weapons (torpedoes, mines) do not use ship's energy and
can be fired at full strength even with low power allocation. However,
they have global cooldowns that prevent simultaneous fire. They can
however be alternated. (useful info: here)
- You can choose when to spend "bridge officer skill points" to
increase the level of the skills on your BOffs (bridge officers) as
well as to promote the BOff's rank. No boff under your command can
be at the same or higher rank as yourself. All of them draw from the
same pool of points you earn for them.
- Each ship has a selection of bridge stations that can be manned
by your boffs. These stations are limited to a specific career and
rank. If you put a higher ranked officer in that station, you will
only be able to use their skills up to that rank. The rank determines
how many skills that boff can have for each of space and ground. Note
that their ground skills are not limited by bridge stations, but rather
their true rank.
Ensign = 1 Skill
Lieutenant = 2 Skills
Lieutenant Commander = 3 Skills
Commander = 4 skills
- Training a boff in a new skill will REPLACE an existing skill,
even if it's one they can't use yet because they're not high enough in rank.
The skill version (such as Jam Sensors II and Jam Sensors III) mostly
separates the skill into specific rank tiers so that it's available to your boff
at different ranks, and there's a difference in the level of ability
in that skill. There's no point in getting it twice at two different grades,
but you may find certain skills to be more important to you, and may want
to replace skills and move them around later so that you can have the higher
grade versions of the ones you use the most.
Each skill upgrade (50 boff points for a boff skill, 150+ captain skill points for
a captain skill) increases the skill's level, up to a maximum of 9. Skills are all
designed to give high bonuses early,
and diminishing returns at the higher levels. You may find it worthwhile to invest points evenly
at first, and grab skills broadly, especially in the first few ranks of the game.
These skills start broad anyway, and will enhance everything your ship and crew do.
Later the skills get more specialized. Upgrading a skill to level 9 will in some
cases grant an additional ability, usually to train specific skills into your
own boffs. (skill system redesigned into a skill tree, instead of a points system)
- There is a level cap and skill point cap for your captain, but you will always
be able to earn more boff skill points and keep customizing and improving your
bridge crew. Here's a
great thread about skills.
- The ship's power system consists of 200 points than can be distributed
over four systems. By default, 50 is put into each, and each has a maximum of
100. Dropping a system below 50 severely reduces its capability, and above
50 can drastically improve it. Here is what they do:
- Weapons: damage output of energy weapons, but not projectile weapons.
- Shields: Overall strength and recharge rate
- Engines: Forward speed and acceleration
- Auxiliary: Science and engineering skills and effects, and a slight impact on maneuverability.
- Ship's power levels all start at 50. They have a maximum of 100 and a minimum of 25.
Since there are 4 systems, you have 200 points to allocate. Increasing one will decrease
the others. Weapons and shields have a linear relationship, with energy weapons doubling
in damage output at 100 power, and shields tripling their recharge rate at 100 power (and
they stop recharging completely at 25 power). Weapon power does not affect torpedoes.
Here
is a great link talking about power levels.
- Different weapon types have different ancillary effects:
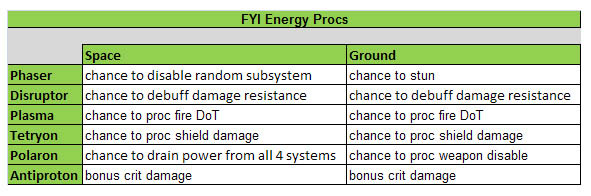
And they have different damage rates based on firing arcs and types as well.
See this
good forum post about it.
- For an excellent article on the difference between beams, cannons, arrays, banks,
turrets, etc, read
this article!
 PROGRESSING THROUGH TIER 1 / LIEUTENANT
First you will begin as an Ensign, and play through the tutorial. The tutorial
is fairly short, but leads you through the basics of ground combat and space
combat. At the end of it, you will be in command of your Tier-1 (Miranda or
similar) ship. Spend your first skill-points and you will be a Lieutenant.
Completing the tutorial gives you your first bridge officer (boff). It doesn't matter
much which one you choose, as you'll want one of each career as soon as possible,
and you will get to choose a second as soon as you complete the first story-line
mission. And soon after, you'll have enough Dilithium/Merits to buy your third.
After arriving at the Earth spacedock, you'll want to take the turbolift up to
the admiral's office (door will be in the lobby off to the right of the
transporter room), and get your first
missions (note that in order to turn-in your quests and receive new ones from
the admiral, you do not need to return to his office, and can instead
hail Starfleet from your ship!). You'll also want to spend your first skill points.
Also note that Sulu is right behind you in the Admiral's office and has more
quests for you.
To spend your skill points, open up the "K" skill window. Here you can allocate
your captain skill points, and your bridge officer skill points (two separate
point systems so that you can level up yourself and your bridge crew separately).
You will see the entire set of skills available to both you and your boffs here.
It costs 150 skill points to upgrade a skill level, or 50 boff points to upgrade
a boff skill.
Don't bother hoarding points to use in later levels at this point. You
need to spend a certain amount before you can be promoted, and these early skills
are very broad, enhancing entire ranges and groups of systems or abilities. Even
after getting a higher rank, you may want to come back and max out these early
skills.
Each skill can be raised to level 9, but due to diminishing returns, you can
get almost 90% of its available bonuses by raising it to rank 7. It's difficult
to raise too many skills all the way to 9, so you'll probably be happy with
a lot of skills being between 5 and 7, depending on what it is.
This system of high early
gain and diminished returns at the high end helps you to improve quickly at
first, and gives you the "best bang for the buck" by improving all of your
skills with a few points each before narrowing your focus. At this stage, it's
more about breadth than depth.
Each boff starts with a specific linear skill advancement for each of ground
and space. Whether you train your boffs with your captain,
buying a skill at the spacedock, or "consuming" a looted boff as a free
skill-training, such training will always replace one of these existing skills
and you will have to start over in leveling-up that skill. But this gives you
enormous flexibility to develop the skill set you want in each boff. And ultimately,
this determines what special abilities your ship and away teams will have.
You will want to do as many of the plot missions as you can, as they will have
the largest skill point rewards. But don't forget to go out to Starbase 24 and
hang out and blow up a lot of Klingons! The loot here is better than you will
get in the missions, and this will be your main way to get better weapons and
ship equipment, and energy credits to spend on better personal gear for your people.
The main missions take about 40 minutes to an hour each, like a TV episode, and will have a mix of
ground and space activities. This still works well for casual players, because
you can quit out and resume the mission later. If you have to abort, you will
continue from the last check-point, which will be the last time you beamed
up or down, or warped into an area.
For fleet operations, you can come and go as you please. You just have to be out of combat
for about 20 seconds before you can warp away. Easiest way to get clear? Get blown up!
There is no death penalty. You merely respawn. (note: if you play on the harder
skill-level settings, death results in cumulative wounds or ship damage that must be
healed/repaired, but that is beyond the scope of this article)
 MOVING BEYOND TIER 1
At "level 11" you can be promoted to Lieutenant-Commander. It's at 11 rather
than 10 because "level 0" is Ensign and Lieutenant is thus 1-10. To get
promoted, visit the admiral's office again.
Now you can get your first ship upgrade, with a choice involved. The ships follow
the same career options as the characters, in that there is an Escort class (Tactical),
Cruiser class (Engineering), and Science class (Science). You DO NOT have to
pick the same class as your captain. In fact, you don't even have to pick the same
class at each rank promotion! You can also buy the other classes later.
Be sure to examine this fan-made chart and look at the number of weapon slots (front
and rear), boff slots (and what rank they are), turn speed, crew, etc:
Ships in a nutshell:
- Cruisers: Most versatile, but least maneuverable. Largest crew (repair rates, boarding parties, etc), most energy, most device slots (like a potion quick-bar), most hull strength, and most weapon slots. However, they turn like school buses, and get slower as you progress to bigger cruisers. (cruiser tips)
- Escorts: Fastest and most maneuverable. Almost as many weapons as cruisers, and can arm cannons which can allow them an even higher damage output. Least crew, least device slots, and weak hulls. Escorts are like fragile, high performance sports cars.
- Science: Splits the difference of the other two in many ways. Strongest shields, Least weapon slots. Right between cruisers and escorts in terms of crew and device slots. Reasonably maneuverable all the way up through Tier 5. Innate cloak detection and subsystem targeting. (I have a guide to DPS-oriented science ships on this website)
Some players recommend picking a different class of ship than your captain for solo
play, and make them the same as a specialized role for fleet operations. I think
this is fine, but I also think it's not so important.
My advice is to pick your ship class based on how you like to operate your
ships. All three types have their own respective emphasis on how many of each type of boff they have
stations for, and how many "consoles" of each type they can equip (consoles are
passive enhancements). But most importantly, they differ in terms of maneuverability,
shield and hull strengths, and damage output. These should be your biggest deciding
factors, regardless of what career your captain is.
Some people try to pigeon-hole the ship types into the "MMO Trinity" of Tank, DPS, and Healer/Support, but it
doesn't really work that way. Cruisers don't make fantastic tanks because they have no way to draw aggro and
don't have the best shields. Science isn't about healing in fleet operations, it's really more about
debuffs, and those are short-lived with long cooldown timers. Escorts are definitely a good DPS
class, however. In fact, it can almost be argued that Science ships are better tanks due to their
strong shields, and Cruisers are better support ships due to their engineering focus. However,
Cruisers and Science ships should probably be seen more as ship classes that are more
balanced and versitile in other ways than Escorts, each with their own inherant flaws and strengths.
When taking into consideration the number of weapon slots, it's worth noting that a
smaller number of slots isn't necessarily a disadvantage. There is a global "cooldown" on
torpedoes that prevents simultaneous fire, so it's not worth equipping more than two on each of the front and back of
the ship. Phasers cause a drain on the ships power if you fire more than two simultaneously,
causing diminishing returns on having too many in overlapping firing arcs. In fact, it can
REDUCE your damage output. Between these, it can be challenging to come up with a
highly effective and efficient weapon configuration on the larger ships.
If you dump 100 power into weapons, it's best to have 5 or 6 energy weapons firing at any given time.
However, you only want to use around 3 if you only use 50 power on your weapons system. Take that into
account when choosing your ship and tactics.
Also, keep in mind that Escorts are "glass cannons" in that they're powerful but fragile. Cruisers
have a lot of versatility and rarely have power problems, but they're also the least maneuverable.
Science stands alone, in that it has the broadest set of tools available to it, but is the most
difficult to understand and use optimally, but can also be the most fun if you enjoy those abilities.
USEFUL RESOURCES
Player vs Player, aka PVP
Some notes on PVP I sent to my fleet, from 2010-04-05:
I've only been doing Fed vs Fed, since I'm at the Admiral level, and there are very few klingons at that level. So you either have to
do FvF, or wait for a looong time for enough klingons to get in the queue. For FvF, during the evenings you can play almost
constantly, with maybe a minute or two between matches. And you're pretty much gauranteed a fair fight (since it's all fed).
All 3 classes are valuable in PvP, though admittedly the escorts probably do pop a little faster. Since they're more squishy, those
who know what they're doing know to target them. But there are a lot of PVPers who still tend to go for the nearest target and stay
on it, even if it's chaining shield abilities and is being buffed by other ships (which of course SHOULD make you want to switch
targets). The really good escort players focus on a target together, and blow it up, and then zip out of range to heal up if they
need to. But this is where a Jam Sensors or Reverse Shield Polarity helps too.
Generally letting the cruisers go in first, with the science and escorts right behind them, works pretty well. The most important
thing is to STICK TOGETHER, and focus fire on one or two targets at a time.
The most ridiculous winning match I was in was 15-0, with my team (the winners) having 2 escorts (one of each type), 2 cruisers (one
of each), and me as the only science. Since it was an "arena" fight, 15-0 meant we didn't lose a ship once. Another time I had a team
that did 15-1, and I think we had 3 cruisers and 1 escort.
Reverse Shield Polarity and at least one Science Team ability are pretty much a must. Covariant Shields are ideal, since you take so
many hits that the regen rate doesn't matter much.
Because the other team will have a lot of shield-heals (sci team, RSP, etc), you really need to lay on the damage, so EPS consoles
and 100 weapon power are the way to go.
Otherwise, the tactics you use in PVE apply very well. Scramble Sensors isn't so useful though, since all it does is make everything
targetable (and smart players will still know who to shoot). Jam Sensors is great, since you become invisible to the guy you use it
on, and he may not even realize you're still shooting at him.
I recommend using alternate boffs with skills for PVP vs PVE. I only change out one science officer on mine, mostly to drop Scramble
Sensors in favor of adding a second Feedback Pulse. I use two Sci Teams in both cases.
I'm actually enjoying the PVP, and I don't usually like MMO PVP (except planetside which was built around it). It's fast-paced and
competitive, but it's also tactical and fluid the way Tribes or multi-player SFC were.
And despite the whining on the forum, you only blow up in 2 seconds if you're being stupid, or if the other team chooses you to focus
on. Even then, you can usually mitigate these things to some degree abd buy some time.
You do have to be willing to die a lot though. :)
Player vs Player, aka PVP
Some additional notes on PVP I sent to my fleet, from 2010-04-12:
1. DPS is still king. All the buffs/debuffs, science abilities, etc, only
matter so far as to what they can do to destroy the other guys quickly, or
prevent you from dying. If you can boost DPS instead of playing with
something more gimmicky, that's the way to go. And thus, 100 weapon power
and a Covariant Shield is the way to go. Reverse Shield Polarity is a
must.
2. Since DPS is still king, right now cannons/turrets are generally better
than beams. Turrets are great because they can fire AT ALL TIMES in any
arc. A high DPS weapon becomes low DPS IF YOU CAN'T KEEP IT IN ARC. But
also, beams don't have an equivalent to Rapid Fire (at least not in the T1
and T2 ranks that all ships can use), where RF boosts all cannon weapons
on your ship simultaneously. With a 15 sec duration and 30 sec cooldown,
you can increase DPS 50% of the time on all your cannons/turrets. Single
Cannons do almost as much base DPS as a dual bank (192 for cannon, 213 for
dual bank), but have twice the arc, at 180', and get boosted by Rapid
Fire.
3. Beams have another disadvantage. They're susceptible to Feedback Pulse,
while cannon weapons are not. This will change later, but for now it's the
case.
I ended up changing out a few things on my ship in recent weeks. I now
have (all mk-X):
Fore: 1 beam array (250', 160 DPS), 1 single cannon (180', 192 DPS), 1 quantum.
Aft: 3 turrets (360', 120 DPS)
With 2 EPS (+1.3) consoles, I can fire all 5 energy weapons, 4 of which
get boosted with rapid fire. The beam is still there so I can do subsystem
targeting. Otherwise I'd swap that for another cannon. But part of the
important thing here is I can hit with all 5 in the front 180' arc. Only
the rear 110' gets reduced to 3 weapons. So it's sustained DPS.
It's not hard to come up with a good sustained DPS loadout. So I do get a
bit surprised that I out-damage most other non-escort ships in the PVP
PUGs. But I think I surprise them too.
Etc
More to come...