
WHAT? SCIENCE DPS?
NOTE: This is just a starting point. Much more advanced configuration exists in the "end game".
Yes, I said DPS (Damage Per Second) on a Science Ship. There are many approaches to playing
any given ship class in STO, and this is just one approach. But my philosophy on ship configuration
has worked out well for me in the game, so I thought I'd explain it here. If you're new to the
game in general, you might also want to look at my beginnner's guide for general
information about ship and captain classes, general game play, and character progression.
It's true that the Science ships start out at a disadvantage in terms of weapon slots. By the time you
reach Captain, your science ships will have 6 slots, and you will not get more at higher ranks. Escorts
and Cruisers top out at 7 and 8, respectively. Also, they tend to have the least tactical console slots,
so you can't stack as many DPS-enhancing consoles. So it's true that science ships can't optimize for
DPS as well as the other classes, but slots aren't everything, and optimizing your DPS will
definitely help you in all combat situations. Plus,
science ships make up for the lower number of slots by adding innate subsystem targeting (a weak version
of those skills, but you get all four), plus shield bonuses. We get the best shield strength and
regeneration rates of all three classes.
So why is this guide about DPS? Simple. DPS wins the game. Cryptic has gone to great lengths to try to
make the other aspects of your ship important, but the balance has always remained such that higher DPS
beats anything else you can do, hands down. So even though you're flying a science ship, unless you're
taking a support role in a fleet action or PVP team, DPS is what will make most battles fun and exciting, rather than
an exercise in frustration.
Also, if DPS matters most, why play Science? That's actually the wrong question. You should play Science
if you like the Science ships and abilities. You should always pick a class based on what your
style is and what you'll enjoy the most, and then worry about optimizing it afterward.
While this discussion centers around science ships, it applies to Escorts and Cruisers as well. However
my point is to help the confused or newbie Science Captain and hopefully show that Science ships are
not necessarily gimped. Playing science is like playing the game on a slightly harder skill level. They're
perhaps the hardest to play "well", but also give you a wide variety of toys to play with.
For the sake of this discussion, I'm going to talk about Admiral level ships, but it all still applies
to earlier levels of the game, just with a subset of the options available at any given time, and
fewer weapons. The weapon configuration applies to Captain directly too, since Science is the one
branch that hits its maximum number of weapon slots at that rank.
GENERAL TIPS
Here are some general tips. This applies to anyone wanting to do DPS.
- Use 100 Weapon power, 50 Shields, 25 Engines, and 25 Aux.... Almost all the time.
This may seem at odds with what you've been lead to
expect for a Science ship. But here's why it matters:
- Weapon power matters most for DPS and allows you to fire more weapons
continuously. You need 100 power to dish out the damage. It's that simple.
- Shield power is necessary to keep your shields recharging during fights.
If power falls below 25, the shields stop regenerating. This can easily
happen if you get hit with a debuff. If it reaches 0, the shields drop. Science
already gets good shield bonuses, so more power in shields won't serve you well.
Regeneration during a fight is slow enough to be almost useless, so dumping
more power in will only get you slightly higher resistances. 50 power is mostly
insurance against debuffs.
- Engine power is nearly useless. Speed is only needed if you need to extract yourself,
and you can switch power levels to do that if needed.
- Aux affects many of your science abilities, so higher power here helps. But it
doesn't help as much as HIGH DPS does. If you use an EPS power-transfer console,
you can switch power levels quickly enough to dump 100 power into Aux, use an
ability, and the switch back. But even if you don't do that, all this will usually
do to you is leave shorter durations on your science debuff abilities and the like.
- Use a Covariant shield.
Regenerative shields recharge really fast, and you can fight a
defensive game by putting 100 power into shields while using one. This works OK at the early levels of
the game (I did this for a while), and with the Science ship bonuses, you can rotate
your ship and have shield facings completely recharge before you need them again. BUT.
This makes the fights take a really long time, and doesn't scale well to the higher levels.
Covariant shields have really poor regeneration rates, but have about double the capacity
of regenerative shields. You'll be needing to rely on shield heals in battle more than
the natural regeneration rates anyway, no matter what shield type you use. So go for large
capacity. Just do it.
- Choose wisely between "combat" engines & Hyper-Impulse.
Hyper-impulse engines have a very wide range of
speeds, and can go very fast when you dump a lot of power into them. But they also
slow to a crawl with low power. You're going to use low engine power most of the time, right?
So "combat" engines might be better for you. Although, speed often doesn't matter much in
combat unless you need to get some distance in a hurry, and "hyper-impulse" engines will
run much faster at full power than "combat" engines. Understanding this difference is useful.
To summarize-- All engines have the same basic speed (the "flight speed" stat on the engine)
at 50 power. Combat engines are the fastest at 25 power, and Hyper-Impulse engines are the
fastest at 100 power. Choose based on how you tend to maneuver.
- Put all of your energy weapons on auto-refire..
Right-click their icons in the tactical HUD so that a green
border lights up around the icon. They will automatically fire as fast as they can
whenever they can.
- Don't be afraid to die.
Weapons do a lot more damage at close range. Beams are longer
ranged than cannons/turrets, but they still suffer at a distance, just not as badly.
If you want to hit an enemy and melt them into nothing, you need to get right up next
to them, especially if you go with my suggested loadout of cannons and turrets. Yes,
you may die occasionally, but DPS favors the bold, and you have the best shielding
of all three classes.
- Don't be afraid to use your abilities/skills
Some skills are very situational or have really long
cooldowns, so you may want to save those for the right moments. The rest of them
just need to be used. A lot. Anything that's a debuff to the enemy or a buff to
yourself. Use them. As much as you can.
- Spend your skill points wisely.
Make sure you spec a lot of points into the skills that raise
your power levels, and boost your weapons, particularly your energy weapons, since
they do the bulk of the work. Get these skills up to 7, at least.
WEAPONS
I'll break down the torpedoes and energy weapons separately. But first, let's understand how
you get to optimal DPS. THIS IS THE LEAST UNDERSTOOD ASPECT OF MAXIMIZING DPS:
... And it will sound horrendously obvious:
You need as many weapons as possible hitting the target as frequently as possible. Sounds pretty
straightforward, right? Here's the problem. All weapons have a specific firing arc. Generally
speaking, wider-arc weapons do less damage, and narrow-arc weapons do more damage. Most people
look at the DPS numbers and just throw harder-hitting weapons on their ship. But the arc matters.
A LOT.
My Philosophy is that it's better to hit continuously with lower-DPS weapons, than to only occasionally
get to fire a harder-hitting weapon. Science ships are reasonably manueverable, for the most part. But
they're not dogfighters like the Escorts. Avoid dual-beam-banks like the plague, for this reason.
The other aspect that's ALSO NOT UNDERSTOOD by a lot of players is just how important
your energy balance is, and how that affects DPS across all your weapons. I'll get into this in
the Energy Weapon section below.
PROJECTILES (TORPEDOES)
I'm starting with Torpedoes because because it's simple, and boils down to a matter of choice.
Torpedoes rip up the hull of a ship, but do little damage to shields, so they're situational.
I'm not going to get into the more exotic forms of projectiles in the game, but rather just
talk about Photons and Quantums.
The choice between those two is really up to you, but I favor Quantums for a simple reason.
They hit harder in a single volley (more burst damage). Photons have a slightly better DPS
(lower burst damage but they fire much faster), but to fully take advantage of DPS, you need
to keep a weapon in arc and fire it continuously. Any weapon that gets fired infrequently
due to arc or situational usefulnes REALLY needs to be focused more on the BURST damage.
But these two are close enough together in effect that it's largely up to you, and whether you
tend to keep your nose pointed right at the enemy.
(note: I've since switched back to Photons over Quantums, just so I can be less careful
about timing, by firing them frequently. But it's just a matter of taste at this point)
ENERGY WEAPONS
Energy is the name of the game. The bulk of your DPS will come from these weapons. They're more
effective against shields than hull, but they work against hull reasonably well too.
First, pick an energy damage type, and stick to it. I know it's tempting to mix them. This can
be OK too, but please understand your overall DPS will be a little less. Just know that if you're
mixing the damage types to maximize the variety of debuffs/procs you can get, that you'll do
a little less DPS. I'm steering you toward DPS.
Next, fill all your tactical console slots (probably two of them) with consoles that boost the
damage of that energy type. If you mix types, get the consoles that boost energy weapons in
general. They have a slightly lower bonus, which is why I'm suggesting you stick to one energy type.
A pair of Vice Admiral phaser consoles, for instance, will make a pretty drastic increase to
phaser damage.
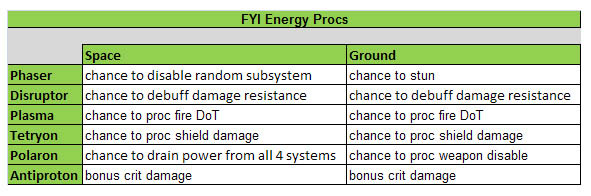
To choose the energy damage type, look at this chart below. Most of these proc effects have about
a 2% to 2.5% chance to occur. They also look different and have different sound effects. Otherwise
they're identical, and the only other difference might be what resistences the enemy has.
Now comes the part that people don't think about. As I pointed out earlier, people
tend to fixate on the DPS numbers of the weapons they can choose, and don't put enough emphasis
on the weapon arcs, and how many weapons they should be firing concurrently. Your weapons need
to work together as a well-oiled machine.
Take as an example the Turret. It has the worst DPS of all of the weapons, but it has a 360° arc.
Depending on how you steer, this could be one of the highest DPS weapons on your ship, because it
can fire ALL THE TIME. Hypothetically, a weapon with 50% more damage output than the turret, that
stays in arc only half the time has effectively 25% less overall DPS over the course of the battle.
At any given time, any weapon that is out of arc has ABSOLTELY ZERO DPS.
But there's more to it than that. You need to think about how many weapons you can fire, without the
energy loss creating diminishing returns. Every weapon puts a drain on your weapon power setting.
And when the power level is at 50, the weapon does its normal damage. At 25 they do half damage, and
at 100 they do double damage.
You may have noticed that beam weapons and forward single cannons drain 10 energy, and turrets drain 8.
For the sake of argument, I'm going to use 10 as the base estimate of what a weapon drains. If you start
from 100 power, you can fire 5 weapons simultaneously and drop to 50 power (normal damage) ... (though technically,
I believe the first weapon is free and additional ones drain, but for the sake of argument I'm going to
assume they all apply a drain). If you take into account the damage level percentages, you'll see that
at 100 power or higher, 5 or 6 weapons becomes the optimal number to have firing simultaneously for
maximum damage output.
| Assuming NO "free" weapon drain |
| # Weapons | Total Drain / Resulting Power | Damage per Weapon | Total damage |
| 1 | -10 / 90 | 180% | 180% |
| 2 | -20 / 80 | 160% | 320% |
| 3 | -30 / 70 | 140% | 420% |
| 4 | -40 / 60 | 120% | 480% |
| 5 | -50 / 50 | 100% | 500% |
| 6 | -60 / 40 | 80% | 560% |
| 7 | -70 / 30 | 60% | 420% |
| 8 | -80 / 20 | 40% | 160% |
| Assuming ONE "free" weapon drain |
| # Weapons | Total Drain / Resulting Power | Damage per Weapon | Total damage |
| 1 | -0 / 100 | 200% | 200% |
| 2 | -10 / 90 | 180% | 360% |
| 3 | -20 / 80 | 160% | 480% |
| 4 | -30 / 70 | 140% | 560% |
| 5 | -40 / 60 | 120% | 600% |
| 6 | -50 / 50 | 100% | 600% |
| 7 | -60 / 40 | 80% | 560% |
| 8 | -70 / 30 | 60% | 480% |
(There will of course be variations due to power-level skills, how many of those weapons are turrets
and thus have less drain, etc).
As you can see, it's ideal to keep 5 or 6 weapons firing constantly. But science ships only
have 3 forward slots, one of which will probably be a torpedo launcher, right? This is why we
use turrets. They turn those back slots into forward-firing weapons. It's a no-brainer at this point
to put 3 turrets on the back of your ship. Technically, you could put beam arrays back here and
do broadside attacks, but you then limit what your forward arc can do, forcing you to keep one
shield facing enemy most of the time. Also, this would not allow you to stack the Cannon Rapid Fire
skill, as I'll get into below.
The front has some more flexibility. I'm going to assume you're using a torpedo launcher, so you'll
have two slots left to work with. What you do with them has some more flexibility, and will depend
greatly on how well you steer and how well you can keep your front and/or side arcs aimed at the
enemy. You will need at least one beam array, so that you can use your subsystem targeting abilities.
These are free tactical skills, so I highly suggest you use them.
Here is my loadout:
Fore: Quantum Torpedo Launcher, Beam Array, Cannon
Aft: 3x Turrets.
Here's the benefit of having 3 turrets and that cannon on there. My tactical officer uses Cannon-Rapid-Fire,
which is actually a very useful skill. It has a 30 second cooldown, and a 10-second duration, and boosts
the DPS output of all cannon-type weapons, including the turrets. That means you can boost the DPS of 4 out
of 5 weapons in this configuration, for a third of the fight! The cannon has a 180° arc, and does more damage
than a beam array (250° arc), plus it benefits from this skill.
This configuration allows you to keep 5 weapons in arc, firing continuously, in the front half of your ship. And slightly
behind that, you only lose the cannon and still have a beam and three turrets firing. The only arc in which you
drop to only firing the turrets is in the aft 110°. It's actually pretty easy to maneuver (and to remember
to do so) such that all of your weapons are effective "anywhere in the front". I've found this to be superior
to widening the arc by using two beams and a torpedo on the front, since the cannon can be damage boosted
alongside the turrets, and it still has a pretty wide arc. It's also superior to narrowing the front arc with
Dual Beam Banks, since they don't allow you much room to maneuver and still keep firing.
SCIENCE SKILLS & ABILITIES
As a science Captain, you'll get some interesting abilities that compliment the Bridge Officer science skills.
If you're playing as a Tactical or Engineering Captain, that's fine, you'll just have some different abilities
that compliment the ship's and officer's abilities differently.
For your Bridge Officer skills, I won't go into too much depth here, since it's largely up to you as to how
you want to play with the broad set of toys in the science branch's toolbox. But I'll talk about a few details
and some general thoughts.
For the puny little tactical officer seat, I recommend Torpedo High Yield I and Cannon Rapid Fire I. This way
you have skills that boost nearly all of your weapons (and that beam you remembered to install has it's own
benefits for targeting subsystems).
For the Engineering seat, I highly recommend Engineering Team (hull heal), and Reverse Shield Polarity. RSP
is amazingly useful. Incoming damage recharges your shield, so when you're taking a pounding from multiple
enemies, this can save your life. It has a long cooldown, so save it for when you need it.
Science abilities come in all sorts of varieties, and I think you'll just need to play with them and see what
you like. One thing that science is afflicted with more than the other two classes, is that a lot of the skills
use the same ship systems, and thus have shared cooldowns. I've tried to pick skills that work pretty well
with low Aux, and don't step on each other with cooldowns too much.
I've also opted to put TWO science teams, even though they share a cooldown. The shared cooldown is faster than
the individual cooldowns, so two science teams still allows you to get shield heals more frequently.
I always have on my ship: 2x Science teams (shield heals, removes science debuffs), Polarize Hull
(releases you from tractor beams), Feedback Pulse (damage back to attackers), and Hazard Emitters (hull heal,
removes fires etc). I usually have Mask Energy Signature, but don't always make good use of it.
For my Commander Science bridge slot, I have 3 bridge officers with the same first three skills, and only
the top (commander) level skill varies between them, so I can choose based on where I'm going. The three I
use here are viral Matrix, or Energy Siphon, or Scramble Sensors. SS is great against PVE enemies in
groups, like Klingons, but pretty useless against the borg and only mildly useful in PVP. ES is useful
all the time, since it drains a lot of power from the target and gives it to your power systems. VM is
great against single targets. Not so good if you're being swarmed by small ships in PVE.
As I mentioned, you can run afoul of shared cooldowns if you rely on skills that share a system on the ship.
for instance, Scramble Sensors and Viral Matrix are both sensor probes, which is why I use one or the other.
But there are other Science abilities guides out there, and it's beyond the scope of this article to go
deeper into it. Experiment, and play with the toys, and you'll have a lot of fun with whichever ones you choose.
But remember to use them as a compliment to your weapons, not as a replacement.
In closing, I will once again say that this is just one way to play the game or to configure your
science ship. It has worked well for me, so it may be of use to you. But the bottom line is that
you should play it the way YOU want to. I may even start breaking my own rules soon, just to try
something different.
NOTE: This is just a starting point. Much more advanced configuration exists in the "end game".
|